
Uploading a statement and exporting payment orders to the bank
Why you need this
A statement from the bank's client software turns bank rows into Payda payments: new payments are created for you, and payment orders you already entered are marked as paid. Export works the other way round: your payment orders go to the bank in one file, with no manual entry.
What you need
- A statement file exported from the bank's client software:
.txtformat, up to 4 MB. - A company account in the Расчетный счет (bank account) reference book — Bank accounts.
Step by step
Uploading a statement
- In the menu open Финансы (Finance) → Платежи (Payments) and press Загрузить выписку (upload statement). The Загрузить выписку panel opens on the right.
- Drag the file into the panel or press Выберите с диска (choose from disk).
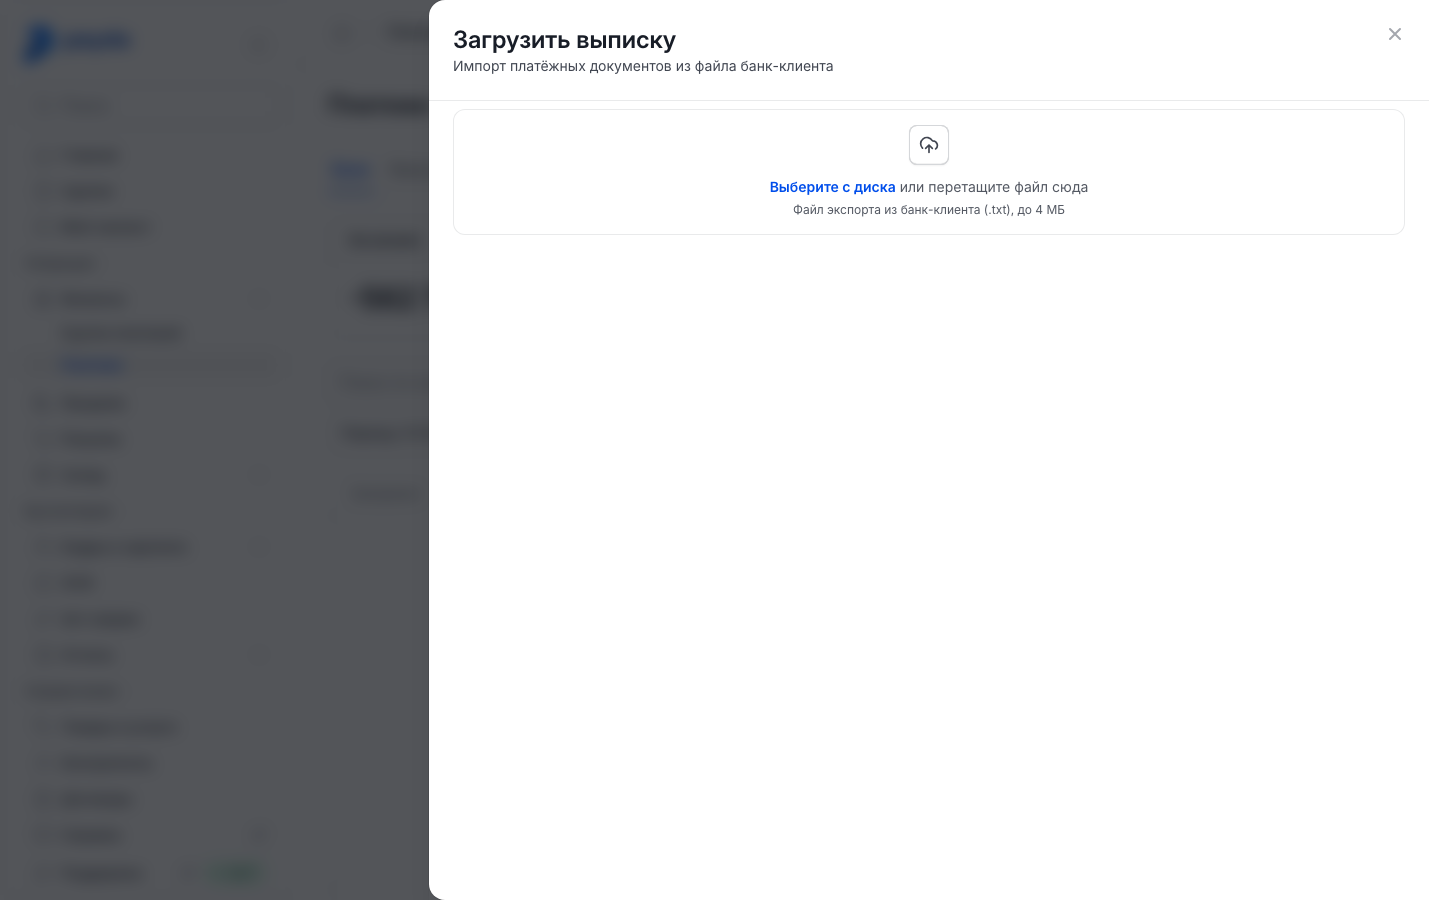
- Check the file details: name, number of operations, account and encoding. If the file has remarks, their count is shown next to it, for example «2 замечания» (2 remarks) — press it to read them.
- Look at the summary above the list — what happens if you upload the selected rows: К созданию (to create), К сверке (to reconcile), Поступления (incoming), Списания (outgoing).
- Check the row selection. Rows that upload without your input are already selected; Выбрать все (select all) selects every available row.
- Press Загрузить (N) (upload) — N is the number of selected rows.
- The upload result appears above the list. Press Готово (Done) to close the panel.
If you close the panel before uploading, nothing is created.
On a phone open Финансы in the app, the Банк (Bank) tab, and press Загрузить выписку at the bottom of the screen. The rest is the same.
What happens to each row
Each operation in the statement has a mark showing what happens to it on upload:
| Mark | Meaning | Uploaded |
|---|---|---|
| Новый документ (new document) | There is no such payment in Payda — an incoming or outgoing payment will be created | Yes, the row is selected for you |
| Отметим оплаченным (will mark as paid) | One of your payment orders matches the row — it will become paid | Yes, the row is selected for you |
| Нужен выбор (choice needed) | Several of your payment orders match the row | Yes — select the row and choose the document |
| Уже загружено (already uploaded) | This row was uploaded before | No |
| Повтор в файле (duplicate in file) | The same row already exists in this file | No |
| Не загрузим (won't upload) | The row failed the check, the reason is written under it | No |
Rows that cannot be uploaded are gathered at the bottom of the list under «Загружать не будем» (won't upload).
A Нужен выбор row asks «Какой документ считать оплаченным?» (which document counts as paid?). The options differ in amount, operation kind and the «Не оплачен» (not paid) or «Уже оплачен» (already paid) mark; payment orders from a batch are labelled «Пакет №…» (batch No.). Select the row and choose the right option — while a selected row has no document chosen, the Загрузить button is inactive.
The «Документ № …» (document No.) link on a row opens the payment found or created for it. The remaining rows can be uploaded in the same panel — documents will not be duplicated. If you upload the same file again, rows already uploaded get the Уже загружено mark.
After the upload
- Read the result above the list: Создано (created), Отмечено оплаченными (marked as paid), Пропущено (skipped), Ошибок (errors). Error texts are under the result, and a notification says «Импорт завершён» (import finished) or «Импорт завершён с ошибками» (import finished with errors).
- Open Платежи: new payments are on the Банк tab, and Payda set Вид операции (operation kind) from the KNP (payment purpose code).
- Open each payment to a supplier and pick Статья ДДС (cash-flow item) in the table row: a statement does not show what was bought, so you choose the item — Cash-flow items.
- Open the tax payment orders from the statement and pick Вид платежа (payment kind) in them, otherwise they cannot be saved — Taxes and contributions: KBK and KNP.
The «Клиент банка» screen
A statement can also be uploaded on the Клиент банка (bank client) screen — payment orders are exported to the bank from there too. The screen is not in the menu; open it in one of these ways:
- on the home page, while the company setup is not finished, — the Руководство по настройке (setup guide) card → Добавить банковский счет (add a bank account), see Setup guide;
- with the link pro.payda.kz/bank/client.
Uploading a statement:
If the company has no accounts yet, the screen says «Расчетные счета не созданы» (no bank accounts). Press Создать расчетный счет (create a bank account) and add one.
The screen opens on the Экспорт (export) tab. Switch to the Импорт (import) tab.
Press Открыть и прочитать данные из файла (open and read data from a file) and pick the statement file.
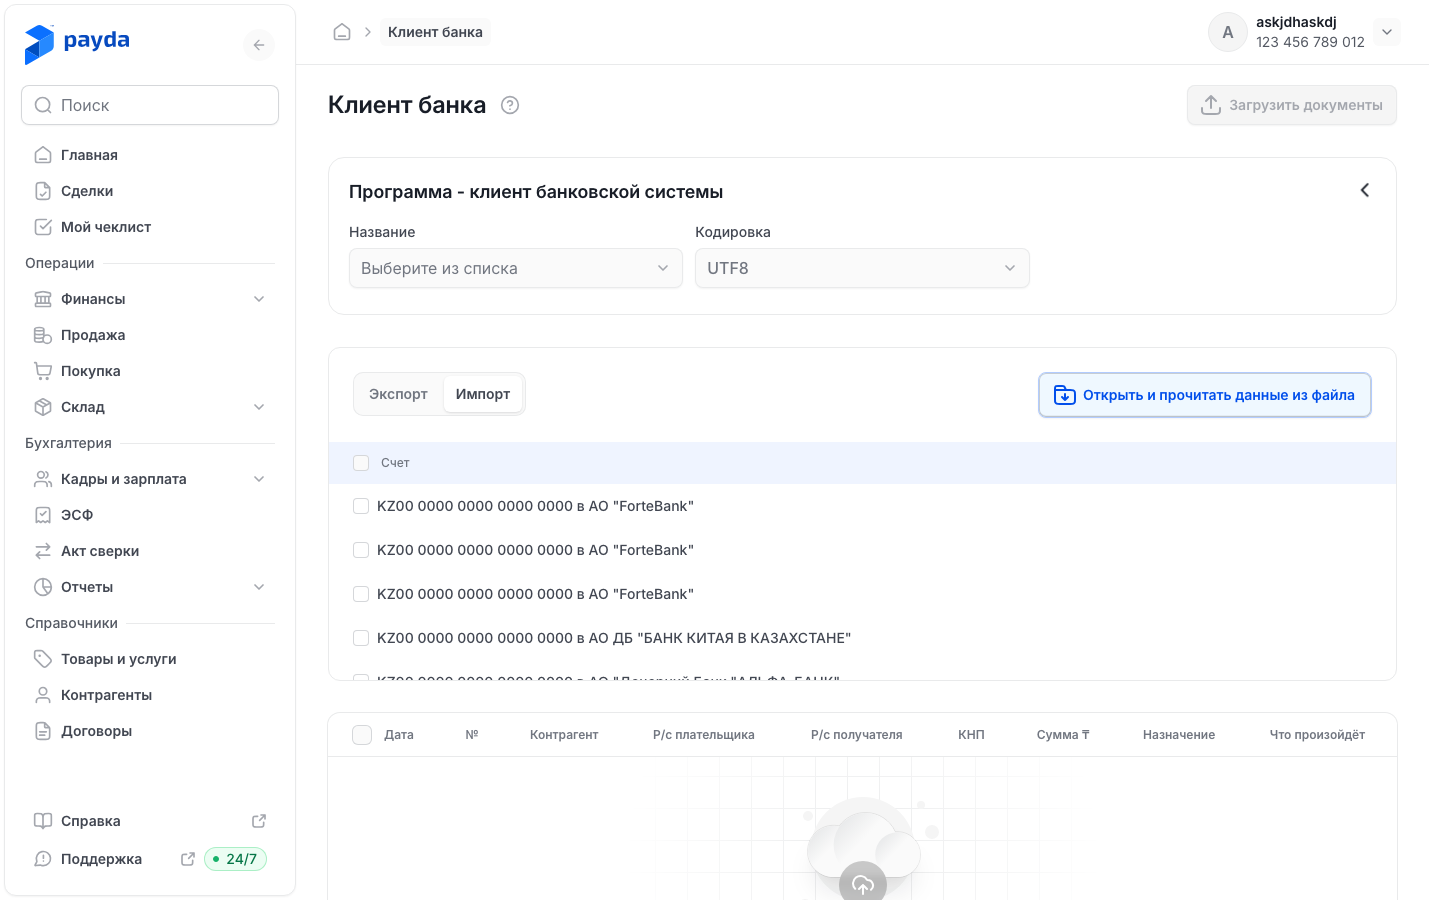
Check the table: Дата (date), №, Контрагент (counterparty), Р/с плательщика (payer account), Р/с получателя (recipient account), КНП, Сумма ₸ (amount), Назначение (purpose), Что произойдёт (what will happen). The Что произойдёт column shows the same marks as the panel on Платежи; select a Нужен выбор row and choose the document right in the cell.
Select the rows and press Загрузить документы (upload documents) at the top right.
On the Импорт tab the Название (name) and Кодировка (encoding) fields in the Программа - клиент банковской системы (bank client software) block are locked: the encoding is detected from the file. To pick another file, press the cross next to the file name.
If the statement's account is not among the company accounts, «Счет не зарегистрирован в системе.» (account not registered) appears. Press Создать счет (create account) in the notification, fill in the account in the Добавить счет (add account) panel and press Создать счет, then Загрузить документы.
Exporting payment orders to the bank
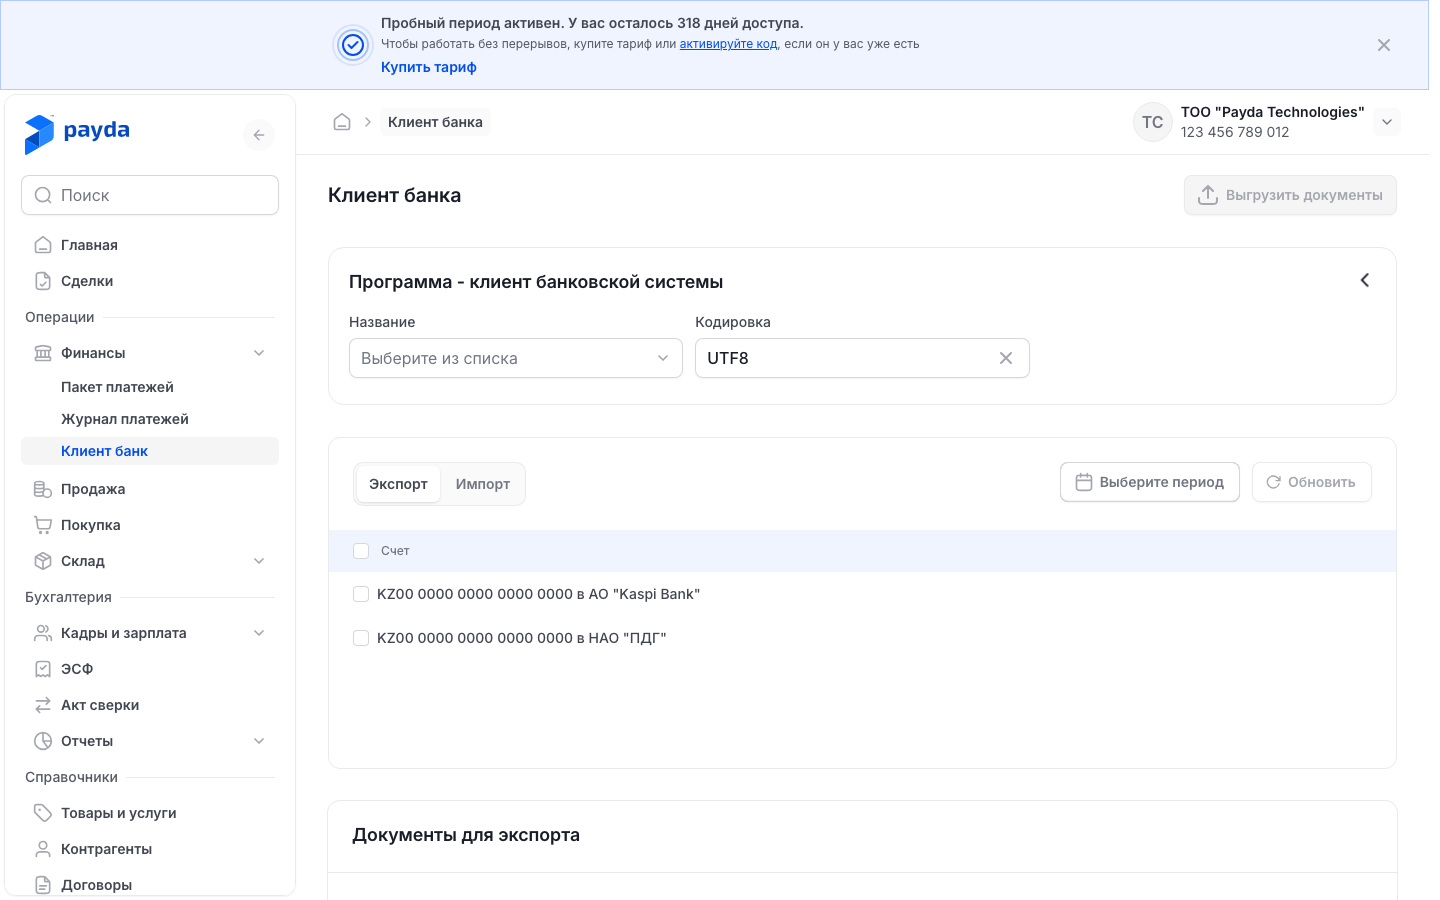
- On the Клиент банка screen stay on the Экспорт tab.
- In the Счет (account) list select the accounts the money leaves from.
- Pick the period. The Документы для экспорта (documents to export) table fills with payment orders; the Обновить (Refresh) button reloads it.
- Select the payment orders to send to the bank.
- In the Программа - клиент банковской системы block pick Название — your bank's software: Банк "ЦентрКредит" Интернет-Клиент, HalykBank Банк-Клиент or HalykBank Интернет-Клиент. Keep UTF8 in Кодировка or pick Windows.
- Press Выгрузить документы (export documents). A file named like «Выгрузка за 30.09.2026 9:05:00.txt» is downloaded — upload it to the bank's client software.
A single payment order can be exported from its own form with the Экспорт в банк (export to bank) button — Outgoing payment. A batch is exported from the batch itself — Exporting to the bank.
How to check it worked
- After an upload, new payments appear on Платежи on the Банк tab, the Поступление (incoming) and Списание (outgoing) totals change, and reconciled payment orders get the Оплачен (paid) status.
- After an export the file is downloaded. The Клиент банка screen shows «Экспорт успешно завершен» (export completed), a payment order and a batch show «Экспорт завершён».
Common problems
| What you see | Why | What to do |
|---|---|---|
| «Файл должен быть формата txt» (the file must be txt) | A file of another format was chosen | Export the statement from the bank's client software as .txt |
| «Размер файла превышает 4 МБ» (file larger than 4 MB) in the panel on Платежи; on the Клиент банка screen — «Размер файла превышает 4 mb» | The file is over 4 MB | Export the statement for a shorter period |
| «Не удалось прочитать файл» (could not read the file) and «Проверьте, что это файл экспорта из банк-клиента (.txt)» in the panel on Платежи; on the Клиент банка screen — «Ошибка загрузки файла» | The file does not look like a bank client statement | Export the statement from the bank's client software again and upload it |
| «Выберите документ в … строке — без этого загрузить нельзя» (choose the document in … row) | No document is chosen for a Нужен выбор row | Answer «Какой документ считать оплаченным?» or unselect the row |
| The button is inactive with the hint «Список документов для загрузки пуст» (nothing to upload) | No rows are selected on the Клиент банка screen | Select rows in the table |
| «Ошибка загрузки файла» (file upload error) | The file was not parsed; the remarks are listed at the bottom of the page | Fix the file according to the remarks and pick it again |
| «Счет не зарегистрирован в системе.» | The statement's account is not among the company accounts | Press Создать счет in the notification and add the account |
| «Список документов пуст» (no documents) on the Экспорт tab | There are no payment orders for the selected accounts in the period | Change the period or select another account |
What next
- Payments and cash desk — what to do with uploaded payments.
- Paying salaries and taxes with a payment batch — payment orders for a payroll sheet in one file.
- Bank accounts — how to add a company account.